Practical Assignment CG 2 / New : some FAQ ...
Let's program another Maya !
In this assignment you are asked to provide a Ray Tracer and its Java3D interface. Because you will include some animation tools, you will be able to export a set of picture in JPEG or PNG format (up to you), given a frame rate and a duration for the animation. The GUI should allow you to create, delete and move around objects, lights, material, and viewpoints, load and save scene descriptions, describe animations, set essential parameters, preview the rendering through Java3D, and eventually start the computation of an image or the set of images.
N.B.
The assignment is expected to be done under Java 1.4(.x ?), with Java3D 1.3(.x ?). It will be tested and marked on one of the eScience lab machine. It should work properly under windows or Linux version of Java. If you have noticed some big difference between the two version, first, try to debug your code, and if you really can't find where is the issue, state the situation clearly in your REAME file.
Mains activities
The main activities are presented here, you could propose them using different type of interface (could be menus, tab panes ...) but try to build an efficient user interface (think about yours HCI lectures or the first reading : "A Summary of Principles for User-Interface Design").
Loading / Saving of a scene and / or an animation
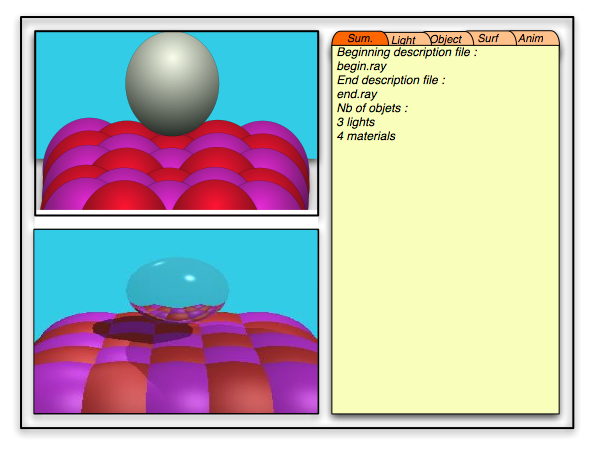
In that activity set , you should be able to load a scene description in memory and to display a pre visualisation in Java3D. Here is an example of that sort of file that contain a minimal set of parameters to be readable from . After editing the scene you should be able to save the new scene in the same file or in a different one of the same format. The second type of file you should be able to read/write is the animation one. When you load that type of file, you should automatically load the matching description of the beginning in memory and display the beginning scene in your Java3D pre visualisation. If the user want to know more about the animation, he has to switch to the "setting the animation" activity. In both the scene and animation example files provided, only the minimum set of parameters are described. Regarding the options you chose to implement, you will have to include additional fields in your files.
Moving objects and lights around
In that activity set, you are proposed with a list of existing objects and lights. Once you have selected one, you should be able to translate it in the 6 directions along x, y and z axis. You should be able to orient it too. For a sphere, you may as well forget the orientation part. For the plane, you just have to propose a way to specify the normal to that plane. For a more complex object, you will have to specify the direction of a given vector of the object (that could be a vector along one edge of a cube for instance) and then the rotation around that vector. Feel free to chose the way to express the rotation, but remember that most of the time, you have to specify 3 values for a general object, (2 for a plane and nothing for a sphere). You should be able to specify both the translation and the rotation, either by pressing a key and getting an incremental change, or directly by entering values into input fields (those field values are of course updated when you press the keys). These fields are for instance the (x, y, z) coordinates of the centre of a sphere. For the translation, the keys will be the following ones :
| Key | Move the selected object in the direction of |
|---|---|
| a | -i or -x |
| d | i or x |
| w | -z or -k |
| s | z or k |
| g | j or y |
| v | -j or -y |
N.B. : The 3D basis is oriented the same way as the java3D one.
For the orientation, you should propose a set of keys and explain it somewhere (either within the GUI, in some online help, or in your README file).
The ambient light is not affected by this activities set. The point light is only affected by translation. The direction light is only affected by the orientation
Moving the camera around
You should be able to translate your view point in the 6 directions along x,
y and z axis (using the same keys as previously).
You should then be able to add some relative roll, pitch and/or yaw.
There should be a way to bring the viewpoint "up".
An additional move will be to select one object in the list of existing ones.
After the selection, view point is updated to look at the centre of that object
(without changing the position of the viewpoint, just its orientation). Once
an object is targeted that way, you should be able to rotate your viewpoint
around that object by staying at the same altitude (rotation around the vector
j), and by always looking at the centre of that selected object.
Adding / Deleting / Editing objects and lights
You may add an object by selecting the type of object you want to create (a least sphere or plane) and a Material. The Material is chosen either from a list of existing ones, or you may chose to create a specific one for that new object by specifying a new name for that Material. The new material will be created with default values, and you will have to switch to the material edition activities set to edit it.
Things you may edit will be for instance sphere radius or change of connected material. It could be the colour and type of a light. Or it could be the change of the unique ID. Both Materials, Objects and Lights are named by the user when it creates them. The name should be an unique ID that contains only alphanumeric character (no space in it).
Material edition
You may only edit existing material. One new material can be created from the "editing objects" activities set only (when allocated to an object). When a material is not used by any object anymore, it should disappear automatically (a sort of garbage collector). A material is defined by :
- Ambient colour - the ambient RGB colour reflected off the surface of the material. The range of values is 0.0 to 1.0. The default ambient colour is (0.2, 0.2, 0.2).
- Diffuse colour - the RGB colour of the material when illuminated. The range of values is 0.0 to 1.0. The default diffuse colour is (1.0, 1.0, 1.0).
- Specular colour - the RGB specular colour of the material (highlights). The range of values is 0.0 to 1.0. The default specular colour is (1.0, 1.0, 1.0).
- Shininess - the material's shininess, in the range [1.0, 128.0] with 1.0 being not shiny and 128.0 being very shiny. Values outside this range are clamped. The default value for the material's shininess is (64, 64, 64).
- Reflection transfer rate : a value between 0 and 1 that express how much light is reflected after a reflection
- Refraction transfer rate : a value between 0 and 1 that express how much
light is transmitted trough the surface of a transparent material.
If you implement the transparent material option, you will have to consider both the refraction and the Material index. - Material index : 1 value between 1 and 10 (really strange material) the default value is 1.52 (glass)
Setting the animation
You go in than mode to memorize the actual configuration as being either the beginning or the end of an animation. Your are able to set everything back to one of those two configurations too. For instance, once you have loaded or created the beginning or end scene. For each entity, the animation is defined either by a linear interpolation of each of its parameters (position, orientation, colour ...) between the beginning and the end, or by special animation. The minimal set of special animation that you have to include is the following :
Rotation of the camera around a chosen object or the centre of the scene (similar to real time moving around an object). You have to propose a specific description line in the animation format
Loop of the animation. By default an object parameter is linearly interpolated between its begin and end value over the duration of the animation. When an object is set up with that special animation, it should loop n times during the same duration. There are two parameters for that special animation : n : the number of loop, and the type of loop : 'single' or 'return'. In a single loop, the value of the parameters get back to the initial ones as soon as you reach the final stage (with probable discontinuities). In a return loop, you linearly interpolate the values from the initial set to the final and interpolate them again on the way back.
Starting the rendering
You should be able to start, stop, restart (where it was stopped), reset, the rendering of a scene or an animation at any time. Therefore, it is probable that you will have to implement the rendering process in a thread. The output of a rendering should be an image (both displayed within a JFrame and saved in a file) or a set of (frame rate x duration) saved images. Each image will be named using the name of the animation and a 4 digit number as a suffix ( ex animation0035.jpeg ). You should not include a complete set of computed images in your assignment jar file (or you will crashed my mailbox !), but instead, you will provides me with at least an animation file (with its two connected scene files) that will demonstrate the main features of your assignment when I will load them and use them to produce some video.
Software design
You could have two sources of inspiration to design your Ray Tracer :
The general architecture is described at http://escience.anu.edu.au/lecture/cg/GlobalIllumination/rayTracingArchitecture.en.html
You'll find an example of code (with lots of deprecated part) at : http://escience.anu.edu.au/lecture/cg/GlobalIllumination/RayTrace.java
You may use some parts from that source, but remember that if you want to do the full assignment, you will have to clearly understand the code and be able to modify its structure. It is sometime easier when you want to fully understand something to rewrite it entirely or not.
Some tips about saving an image
http://javaalmanac.com/egs/javax.imageio/JpegWrite.html
http://javaalmanac.com/egs/javax.imageio/Graphic2File.html?l=rel
A set of classes that should be somewhere in your project
Be sure to include in your code at least the following classes (and use Javadoc to clearly explain their roles) : Ray, Light, Material, Geometry, and Sphere and Plan (Sphere and Plan will indeed extend the Geometry class).Ground Rules for all projects:
- The design and coding must be your own.
- Don't use code from previous semesters, but you could use your own code from previous assignment.
- Cite any models, images, ideas, or algorithms that you do not develop yourself.
- Project is due before 23:55 of the day indicated : 17 October 2003.
- The project will be presented by both members of the group in a 2x5+5 min session on the 29th and 30st of October in the eScience laboratory. Each student will have 5 min to present their part of the project and there will be a 5 min Q&A period.
- Please read this text through to the end before touching the keyboard.
- Then before beginning the project, have a look at this document on the web page : you will find some useful links like the one to the README file model or some pictures of the original work.
- Late : if the assignment is not finished in time, there will be a 10 % penalty
for each day late after the 21rst of October 2003.
To submit a project ...
you should put altogether, in a directory called CG_A2_03_UstudentID1_UstudentID2
(Where 'studentID1'... your student ID !)
- Your well commented Java source file(s)
- Your compiled classes
- The documentation generated by javadoc (make sure you are using the "-private" option in order to have all the classes and methods documented).
- You should not include a complete set of computed images in your assignment jar file (or you will crashed my mailbox !). But instead, you will provides me with at least one animation file (with its two connected scene files) that will demonstrate the main features of your assignment when I will load them and use them to produce some video.
- A 'README.html' HTML file that should summarise and/or describe (it is
your report file and is important in the marking)...
- all that is available in your directory
- the options you have chosen to implement (there should be at least 2 of them)
- how to use your program
- the command line options
- the GUI
- The way you have implemented the algorithm (tricks that are particulars to your work)
- one or more screen shots of your program (that shows both the Ray traced and Java3D images and the GUI)
- main organisation of the project (class, algorithms ...)
Here is its README.html file template
Use the jar command to put your directory into a single jar file based on the same name and mail this file to pascal.vuylsteker@anu.edu.au
cd .. (go to the directory in which CG_A2_03_UstudentID1_UstudentID2 is located)
jar cvf CG_A2_03_UstudentID1_UstudentID2.jar CG_A2_03_UstudentID1_UstudentID2/
Mail the file (CG_A2_03_UstudentID1_UstudentID2.jar) as an attached document. Be sure that the title of your mail is 'CG_A2_03_UstudentID1_UstudentID2.jar'
!!! Your jar file should not be more than 1Mbyte !!!
The minimum requirements
Your project should be composed of, at least, the following :
(1) A set of at least 6 to 8 well balanced large classes (there could be some others of course). Think about it in term of reusability of the code, and allocation of the work between members of the working group.
(2) One public class, whose name will be "Assignment" and that will contain the "main method" in such a way that, to test your project, I will only need to call 'java Assignment [command line argument]' to run it. Because your classes will be well documented, I should be able to write that "Assignment" class by myself without to much work. That means that the aim of that particular class is just to get and treat the command line arguments and launch the main one(s).
(3) You will explain the use of the arguments in your README file but the minimum possibility will be to launch either an scene file (.ray) or an animation file (.ani)
E.g. : java Assignment sboard.ray
or java Assignment animation.ani
The suffix of the argument define its type.
(4) When you write down "java Assignment -h" or "java Assignment -?", you are expected to receive a user's manual (an extract of your README file ?)
(5) Remember that sometime, users may be dumb and may not use the right number of arguments, nor the expected argument.
(6) Your main classes should not have references to the com.sun.j3d.utils package. If you really want to use theses packages, you should encapsulate their use into some of your specific classes. You will then be able to use your personal specific classes in your main classes
(7) the usual comfort of an interface is the resizability of the main frame and the fact that the frame is well dimensioned and placed inside the display screen at the start.
(8) Your code should be well commented and presented (extracted comments for the documentation and some insides comment whenever there is an algorithm to comment.
(9) The compiled classes should be available at the root of your directory. During the marking process, I may :
- unjar your jar file (jar xvf ...)
- cd into your directory (all the file should be in your directory or in subdirectories and should not mess with my working directory !)
- run 'java Assignment descriptionFile.ray'
- del *.class
- javac *.java
- and keep doing other sort of tests ...
(Not So) Optional Development:
You should do at least two ( 2 ) of theses options to get the maximum mark.
1) ViewPoints
At least two different other viewpoints than the default view camera, rendered in another frame (we should have simultaneously : the main canvas3D with the main viewpoint and a second canvas3D where you should be able to switch between the additional views).
2) Additional geometry
You should at least include a triangle and a cube type of object. They should extend the Geometry class
3) Texture
The minimum for that option is to include an image (JPEG, PNG or Gif) into the scene and to make sure than that flat object is reflecting into the shiny objects.
4) Physical modeling of an object
You will provide a special animation that is the one of a free flying object. You set up the initial velocity of an object, and its animation is given by the results from paper : Generic 3D Ball Animation Model for Networked Interactive VR Environments with an acceleration g = 9.81m/s2
5) Mouse
The selection (picking) and the move of an object will be through the use of the mouse (in addition to the default one still expected).
6) Transparency / refracted ray
You should develop the refracted ray behaviour.
7) Movie output
In complement to outputting a set of images, you should directly be able to produce a video (either quicktime or mpeg format) of the animation
8) Animation : from linear interpolation to any function
When one select a specific object parameter, instead of defaulting to a linear interpolation of its value, you should be able to chose within a set of functions which take as an input a fraction of the duration of the animation, the begin value and the end value and a min and a max value: f(t, vbegin, vend, vmin, vmax) such as 0 <= t <= 1. You should define a clear Interface (according to OO, Java meaning) for that sort of function (to be considered as a class), and implement at least two different functions of your choice that will implement that interface. The GUI will allow the user to chose between the default linear interpolation and the other functions. If you think a bit about it, the linear interpolation could be implemented using the same process (with a bit of twining for the rotation).
Example of function that you could implement :
f(t, vbegin, vend, vmin, vmax) = vbegin + (vend - vbegin) * t + (vmax - MAX(vbegin, vend)) x cos( t )
9) Wedge
The building step of the scene and of some animations will be done in the wedge.
Remember that you have to provide a good example of configuration files that will clearly (and whenever it is possible, artistically) demonstrate the quality of your software and of its options.