Both interaction and animation are specified with Behavior
objects. The Behavior class is an abstract class that provides the mechanism
to include code to change the scene graph. The Behavior class, and its descendants,
are links to user code providing changes to the graphics and sounds of the virtual
universe.
The purpose of a Behavior object in a scene graph is to change the scene graph,
or objects in the scene graph, in response to some stimulus. A stimulus can
be the press of a key, a mouse movement, the collision of objects, the passage
of time, some other event, or a combination of these. Changes produced include
adding objects to the scene graph, removing objects from the scene graph, changing
attributes of objects in the scene graph, rearranging objects in the scene graph,
or a combination of these. The possibilities are only limited by the capabilities
of the scene graph objects.
|
TransformGroup
|
Geometry
|
Scene Graph
|
View
|
|---|---|---|---|---|
user |
interaction |
application specific |
application specific |
navigation |
collisions |
visual objects
|
visual objects
|
visual objects
|
View changes with
|
time |
animation |
animation |
animation |
animation |
View location |
billboard |
level of detail
|
application specific |
application specific |
Class Hierarchy |
|||||||||||||||||||||||||
|
|||||||||||||||||||||||||
A custom behavior class implements the initialization
and processStimulus methods from the abstract Behavior class. Of course, the
custom behavior class also has at least one constructor and may have other methods
as well.
Most behaviors will act on a scene graph object to affect the behavior. In Table
4-1, the object a behavior acts upon is refered to as the object of change.
It is through this object, or objects, that the behavior affects the virtual
world. While it is possible to have a behavior that does not have an object
of change, most do.
The behavior needs a reference to its object(s) of change to be able to make
the behavioral changes. The constructor can be used to set the reference to
the object of change. If it does not, another method in the custom behavior
class must store this information. In either case, the reference is made at
the time the scene graph is being constructed, which is the first computation
of the behavior.
The initialization method is invoked when the scene graph
containing the behavior class becomes live. The initialization method is responsible
for setting the initial trigger event for the behavior and setting the initial
condition of the state variables for the behavior. The trigger is specified
as a WakeupCondition object, or a combination of WakeupCondition objects.
The processStimulus method is invoked when the trigger event specified for the
behavior occurs. The processStimulus method is responsible for responding to
the event. As many events may be encoded into a single WakeupCondition object
(e.g., a variety of keyboard actions may be encoded in a
WakeupOnAWTEvent), this includes decoding the event. The processStimulus method
responds to the stimulus, usually by changing its object of change, and, when
appropriate, resets the trigger.
The information in this section, Mechanics of Behaviors, is summarized in a
recipe for writing custom
behavior classes :
1. write (at least one) constructor
store a reference to the object of change
2. override public void initialization()
specify initial wakeup criteria (trigger)
3. override public void processStimulus()
decode the trigger condition
act according to the trigger condition
reset trigger as appropriate
Complex behaviors may require more programming than is described in the recipe.
Method |
Abstract (to implement) |
| Behavior( ) | x |
| void initialize( ) | x |
| void processStimulus( Enumeration criteria ) | x |
| void setEnable( boolean onOff ) | |
| void wakeupOn( WakeupCondition criteria ) |
public class MyBehavior extends Behavior {
	private WakeupCriterion criteria;
	public MyBehavior( ) {
		// Do something on construction
		. . .
		criteria = new WakeupOnAWTEvent( . . . );
	}


	public void initialize( ) {
		// Do something at startup
		. . .
		wakeupOn( criteria );
	}


	public void processStimulus( Enumeration criteria ) {
		// Do something on a wakeup
		. . .
		wakeupOn( criteria );
   }
}
import java.awt.event.*;
import java.util.Enumeration;
// SimpleBehaviorApp renders a single, rotated cube.

public class SimpleBehaviorApp extends Applet {


	public class SimpleBehavior extends Behavior{

		private TransformGroup targetTG;
		private Transform3D rotation = new Transform3D();
		private double angle = 0.0;


		// create SimpleBehavior - set TG object of change
		SimpleBehavior(TransformGroup targetTG){
 		this.targetTG = targetTG;
  		}

		// initialize the Behavior
 		// set initial wakeup condition
 		// called when behavior becomes live
		public void initialize(){
			// set initial wakeup condition
			this.wakeupOn(new WakeupOnAWTEvent(KeyEvent.KEY_PRESSED));
		}

		// called by Java 3D when appropriate stimulus occurs
 		public void processStimulus(Enumeration criteria){
 			// do what is necessary in response to stimulus
			angle += 0.1;
			rotation.rotY(angle);
			targetTG.setTransform(rotation);
			this.wakeupOn(new WakeupOnAWTEvent(KeyEvent.KEY_PRESSED));
		}

} // end of class SimpleBehavior

SimpleBehavior Class in SimpleBehaviorApp.java
As an example of using the custom behavior class recipe of Figure 4-2, this section goes through the process of writing a custom behavior class. For the example custom behavior, the class will implement a simple behavior of making something rotate in response to a keyboard key press.
To create such a behavior class, all that is needed is a reference to a TransformGroup (the object of change for this class), and an angle variable. In response to a key press, the angle variable is changed and the angle of the target TransformGroup is set to the angle. Since the behavior will act on a TransformGroup object, what is being rotated is not an issue.
To create this class nothing more than the three essential
programming ingredients listed in the recipe are needed: a constructor, the
initialization method, and the processStimulus method. The constructor will
store a reference to the TransformGroup object of change. The initialization
method sets the initial trigger to WakeOnAWTEvent, and sets the rotation angle
to zero. As mentioned above, the stimulus to a behavior
is specified as a WakeupCondition object. Section 4.3 introduces WakeupCondition
classes.
Since there is only one possible triggering wakeup condition, the processStimulus
method does not decode the triggering wakeup condition. It is possible to further
decode the key press event to determine which key, or combination of keys, was
pressed.
The processStimulus method always increments the angle variable, then uses it to adjust the TransformGroup object of change. The last job of the processStimulus method is to reset the trigger. In this example, the trigger is always reset to a key press. Behaviors can change their trigger event over time for changing behaviors (another reason for having to decode the trigger event), or not set another trigger for one time behaviors.
The import statements listed in Code Fragment 4-1 are necessary for the behavior class. The java.awt.event import is necessary for the keyboard interaction. The java.util.eumeration import is necessary for decoding the WakeupCondition; and therefore necessary for virtually any custom behavior class. The normal Java 3D API import statements are needed in addition to the listed import statements.
The last step for adding a behavior is to provide a scheduling bounds for the behavior. To improve efficiency, Java 3D uses the scheduling bounds to perform execution culling. Behavior is only active when its scheduling bounds intersects a ViewPlatform's activation volume. Only active behaviors are eligible to receive stimuli. In this way, stimuli can be ignored for some behaviors. The programmer has control over the execution culling through the selection of the scheduling bounds of the behavior.
This class only demonstrates the basic programming necessary for this simple behavior. Enhancements to this custom class are possible. For example, the angle of rotation and/or the axis of rotation could be setby class methods. The behavior class could be further customizable with a method for setting a specific key, or set of keys, that it will respond to. Another definite improvement in the class would prevent overflow of the angle variable. In the current class, the value of angle could grow without bound even though values of 0.0 to 2P are all that is necessary. Although unlikely, it is possible for this variable to overflow and cause a run time exception.
Behavior myBeh = new MyBehavior( );
myBeh.setSchedulingBounds( myBounds );
TransformGroup myGroup = new TransformGroup( );
BoundingLeaf myLeaf = new BoundingLeaf( bounds );
myGroup.addChild( myLeaf );
. . .
Behavior myBeh = new MyBehavior( );
myBeh.setSchedulingBoundingLeaf( myLeaf );
public BranchGroup createSceneGraph() {
	// 1. Create the root of the branch graph
	BranchGroup objRoot = new BranchGroup();


	TransformGroup objRotate = new TransformGroup();
	// 4.
	objRotate.setCapability(TransformGroup.ALLOW_TRANSFORM_WRITE);

	objRoot.addChild(objRotate);
	objRotate.addChild(new ColorCube(0.4));

	// 2.
	SimpleBehavior myRotationBehavior = new SimpleBehavior(objRotate);
	// 3.
	myRotationBehavior.setSchedulingBounds(new BoundingSphere());
	// 2.
	objRoot.addChild(myRotationBehavior);

	// Let Java 3D perform optimizations on this scene graph.
	objRoot.compile();

	return objRoot;
} // end of CreateSceneGraph method of SimpleBehaviorApp
Finding or writing the appropriate behavior class for
your application is the beginning of writing an interactive Java 3D program.
The first step in adding a behavior involves making sure the scene graph makes
provisions for the behavior. For example, to use the SimpleBehavior class from
the previous section there must be a TransformGroup in the scene graph above
the object(s) to be rotated.
Many behaviors need only a single TransformGroup object; however, scene graph
requirements for a behavior is application and behavior dependent and may be
more complex.
Having established the support for a behavior, an instance of the class must be added to the scene graph. Without being a part of a live scene graph, there is no way a behavior can be initialized. In fact, a behavior object that is not part of the scene graph will become garbage and be eliminated on the next garbage collection.
The last step for adding a behavior is to provide a scheduling bounds for the behavior. To improve efficiency, Java 3D uses the scheduling bounds to perform execution culling. Behavior is only active when its scheduling bounds intersects a ViewPlatform's activation volume. Only active behaviors are eligible to receive stimuli. In this way, stimuli can be ignored for some behaviors. The programmer has control over the execution culling through the selection of the scheduling bounds of the behavior.
 or
or 
In the three steps of the using a behavior class recipe, the two most likely programming mistakes are:
not specifying a scheduling bounds (correctly), and
not adding a behavior to the scene graph.
The intersection of the scheduling bounds of a behavior
with the activation volume of a view determines whether or not Java 3D even
considers the trigger stimulus for the behavior. Java 3D will not warn you of
a missing scheduling bounds - the behavior will never be triggered.
Also, keep the scheduling bounds of each behavior object as small as possible
for the best overall performance. As mentioned above, a behavior object that
is not part of the scene graph will be considered garbage and eliminated on
the next garbage collection cycle. This, too, will happen without error or warning.
Behaviors can be placed anywhere in the scene graph.
The issues in picking a scene graph location for a behavior object are 1) the
effect on the scheduling bounds, and 2) code maintenance.
The bounds object referenced by a behavior object is subject to the local coordinate
system of the behavior object's position in the scene graph. In the scene graph
created in SimpleBehaviorApp, the SimpleBehavior object and the ColorCube are
not subject to the same local coordinate system. In the example application
this does not create a problem. The TransformGroup object of the example only
rotates the ColorCube so that the scheduling bounds for the myRotationBehavior
object always encloses the ColorCube object allowing interaction with the ColorCube
when it is visible 2 .
However, if the TransformGroup object were used to translate the ColorCube object,
it would be possible to move the ColorCube out of the view. Since the bounds
object stays with the behavior object in this scene, the user would be able
to continue to translate the object. As long as the activation volume of a view
still intersects the scheduling bounds for the behavior, the behavior is still
active. Being able to interact with a visual object that is not in the view
is not bad (if that is what you want).
The problem lies in that if the view were to change such that the activation
volume no longer intersects the scheduling bounds of the behavior, even to include
the visual object, the behavior is inactive. So the visual object you want to
interact with may be in your view but not active.
Most users will consider this a problem (even if it is intentional).
There two solutions to this problem. One is to change
the scene graph to keep the scheduling bounds of the behavior with the visual
object.
The alternativesolution uses a BoundingLeaf object for the scheduling bounds.
Consult the Java 3D API Specification for information on the BoundingLeaf class.
The mechanics of writing a custom behavior are simple. However, you should be aware that a poorly written behavior can degrade rendering performance.
While there are other considerations in writing a behavior, two things to avoid are: memory burn and unnecessary trigger conditions.
'Memory burn' is the term for unnecessarily creating objects in Java. Excessive memory burn will cause garbage collections. Occasional pauses in rendering is typical of memory burn since during the garbage collection, the rendering will stop 45 . Behavior class methods are often responsible for creating memory burn problems. For example, in the last example, the processStimulus uses a 'new' in the invocation of wakeupOn (line 24). This causes a new object to be created each time the method is invoked. That object becomes garbage each time the behavior is triggered. Potential memory burn problems are normally easy to identify and avoid. Look for any use of 'new' in the code to find the source of memory burn problems. Whenever possible, replace the use of the new with code that reuses an object.
You will see it is possible to set a trigger condition that will wake a behavior every frame of the rendering. If there is nothing for the behavior to do, this is an unnecessary waste of processor power invoking the behavior's processStimulus method. Not to say that there isn't a good reason to trigger a behavior on every frame, just make sure you have the reason.
Class Hierarchy |
||||||||||||||||||||||||||||||||||||||||||||||||||||||||||||||||
|
||||||||||||||||||||||||||||||||||||||||||||||||||||||||||||||||
WakeupOnAWTEvent( int AWTid )
AWTEvent getAWTEvent( )
WakeupOnElapsedFrames( int frameCount )
int getElapsedFrameCount( )
WakeupOnElapsedTime( long milliseconds )
long getElapsedFrameTime( )
WakeupOnCollisionEntry( SceneGraphPath armingpath )
WakeupOnCollisionExit( SceneGraphPath armingpath )
WakeupOnCollisionMovement( SceneGraphPath armingpath )
SceneGraphPath getArmingPath( )
SceneGraphPath getTriggeringPath( )
WakeupOnSensorEntry( Bounds region )
WakeupOnSensorExit( Bounds region )
Bounds getBounds( )
Behaviors are active (able to be triggered) only when their scheduling bounds (or BoundingLeaf) intersects the activation volume of a ViewPlatform.
These methods of the ViewPlatform class get and set the activation volume (sphere) radius. Default activation radius = 62.
float getActivationRadius()
     Get the ViewPlatform's activation radius.
void setActivationRadius(float activationRadius) Set the ViewPlatform's activation radius which defines an activation volume around the view platform.
Class Hierarchy |
|||||||||||||||||||||
|
|||||||||||||||||||||
Active behaviors are triggered by the occurrence
of a specified one or more wakeup stimuli.
The wakeup stimuli for a behavior are specified using descendants of the WakeupCondition
class. The abstract class, WakeupCondition, is the base of the all the wakeup
classes in the Java 3D API hierarchy. Five classes extend WakeupCondition,
one is the abstract class WakeupCriterion, the other four allow the composition
of multiple wakeup conditions in a single wakeup condition.
A behavior object's wakeup condition can be specified as one of the specific wakeup criterion or as a combination of criteria using the wakeup composition classes.
The first method, allElements, returns the enumeration list of all wakeup criterion for the WakeupCondition object.
The other method, triggeredElements, enumerates which
of the wakeup criterion has caused the behavior to be triggered. This method
may be
useful in the processStimulus method of a Behavior object.
WakeupCriterion[] onMouseEvents = new WakeupCriterion[2];
onMouseEvents[0] = new WakeupOnAWTEvent( MouseEvent.MOUSE_PRESSED );
onMouseEvents[1] = new WakeupOnAWTEvent( MouseEvent.MOUSE_RELEASED );
WakeupCondition onMouse = new WakeupOr( onMouseEvents );
wakeupOn(onMouse);
Behavior myBeh = new MyBehavior( );
Sphere myBounds = new BoundingSphere(new Point3d( ), 1000.0
);
myBeh.setSchedulingBounds( myBounds );
Certain visual objects change independent of user actions. For example, a clock in the virtual world should keep on ticking without user interaction. The clock is an example of animation. Animation could be defined as changes in the virtual universe that occur without direct user action
By contrast, changes in the virtual universe as a direct result of user actions are defined as interactions.
As with interaction, animations in Java 3D are implemented using Behavior objects
As you might imagine, any custom animation can be created using behavior objects. However, the Java 3D API provides a number of classes useful in creating animations without having to create a new class. It should come as no surprise that these classes are based on the Behavior class. One set of animation classes are known as interpolators. An Interpolator object, together with an Alpha object, manipulates some parameter of a scene graph object to create a time-based animation. The Alpha object provides the timing.
An Alpha object produces a value between zero and one, inclusive, depending on the time and the parameters of the Alpha object.
Interpolators are customized behavior objects that use an Alpha object to provide animations of visual objects. Interpolator actions include changing the location, orientation, size, color, or transparency of a visual object. All interpolator behaviors could be implemented by creating a custom behavior class; however, using an interpolator makes creating these animations much easier. Interpolator classes exist for other actions, including some combinations of these actions.
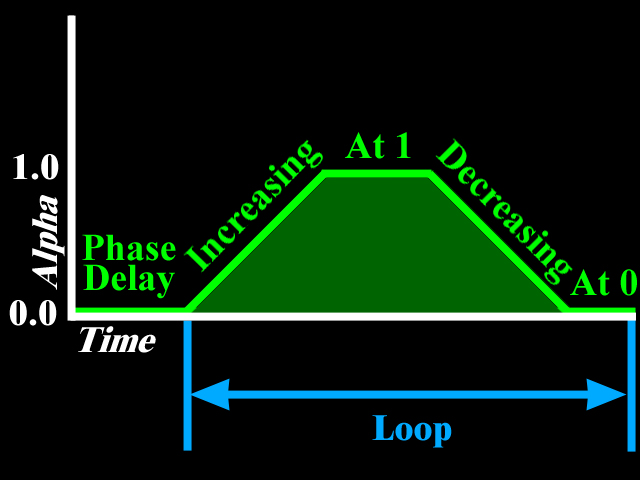
An alpha object produces a value, called the alpha value, between 0.0 and 1.0, inclusive. The alpha value changes over time as specified by the parameters of the alpha object. For specific parameter values at any particular time, there is only one alpha value the alpha object will produce. Plotting the alpha value over time shows the waveform that the alpha object produces.
The alpha object waveform has four phases: increasing alpha, alpha at one, decreasing alpha, and alpha at zero. The collection of all four phases is one cycle of the alpha waveform. These four phases correspond with four parameters of the Alpha object. The duration of the four phases is specified by an integer value expressing the duration in milliseconds of time. All alpha timings are relative to the start time for the Alpha object. The start time for all Alpha object is taken from the system start time. Consequently, Alpha objects created at different times will have the same start time. As a result, all interpolator objects, even those based on different Alpha objects, are synchronized.
Alpha objects can have their waveforms begin at different times. The beginning of an alpha object's first waveform cycle may be delayed by either or both of two other parameters: TriggerTime and PhaseDelayDuration. The TriggerTime parameter specifies a time after the StartTime to begin operation of the Alpha object. For a time specified by the PhaseDelayDuration parameter after the TriggerTime, the first cycle of the waveform begins.
An alpha waveform may cycle once, repeat a specific number of times, or cycle continuously. The number of cycles is specified by the loopCount parameter. When the loopCount is positive, it specifies the number of cycles. A loopCount of �1 specifies continuous looping. When the alpha waveform cycles more than once, only the four cycles repeat. The phase delay is not repeated.
 or
or 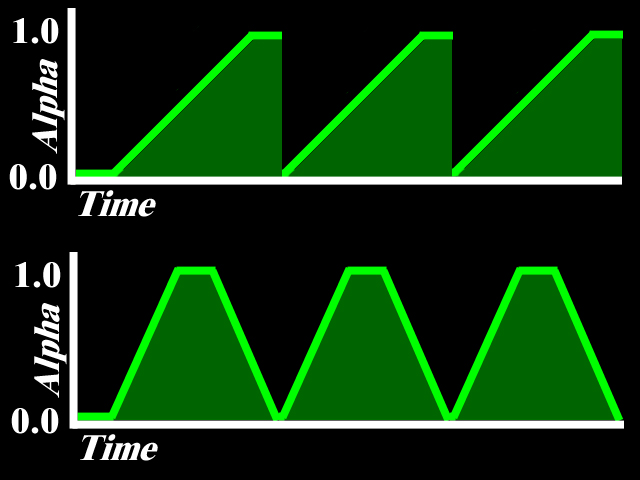
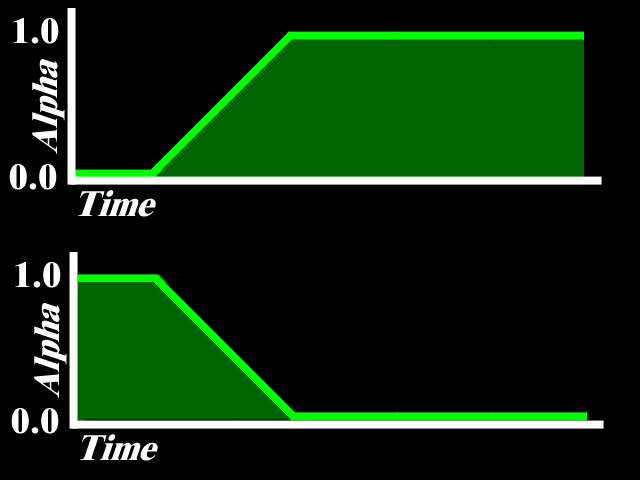
An alpha waveform does not always use all four phases. An alpha waveform can be formed from one, two, three, or four phases of the Alpha waveform.
The alpha object has two modes which specify a subset of phases are used. The INCREASING_ENABLE mode indicates the increasing alpha and alpha at one phases are used. The DECREASING_ENABLE mode indicates the decreasing alpha and alpha at zero phases are used. A third mode is the combination of these two modes indicating that all four phases are used. The mode specification overrides the duration parameter settings. For example, when the mode is INCREASING_ENABLE, the DecreasingAlphaDuration, DecreasingAlphaRampDuration 5 , and AlphaAtZeroDuration parameters are ignored. While any waveform may be specified by setting the duration of unwanted phases to zero, the proper specification of the mode increases the efficiency of the Alpha object.
In addition to the duration of the four phases, the programmer can specify a ramp duration for the increasing alpha and decreasing alpha phases. During the ramp duration, the alpha value changes gradually. In the case of motion interpolators, it will appear as though the visual object is accelerating and decelerating in a more natural, real world, manner. The ramp duration value is used for both the beginning and ending portions of the phase and therefore the ramp duration is limited to half of the duration of the phase. Note that the alpha value changes linearly between the two ramp periods.
Alpha(int loopCount, long triggerTime, long phaseDelayDuration,
   long increasingAlphaDuration, long increasingAlphaRampDuration,
   long alphaAtOneDuration)
Alpha(int loopCount, int mode, long triggerTime, long phaseDelayDuration,
   long increasingAlphaDuration, long increasingAlphaRampDuration,
   long alphaAtOneDuration, long decreasingAlphaDuration,
   long decreasingAlphaRampDuration, long alphaAtZeroDuration)
float value( )
float value( long millisecs )
void setStartTime( long millisecs )
void setTriggerTime( long millisecs )
void setLoopCount( int count )
void setMode( int mode )
Alpha modes include INCREASING_ENABLE and DECREASING_ENABLE to enable use of
increasing and/or decreasing portions of the alpha envelope
void setAlphaAtOneDuration( long millisecs )
void setAlphaAtZeroDuration( long millisecs )
void setDecreasingAlphaDuration( long millisecs )
void setDecreasingAlphaRampDuration( long millisecs )
void setIncreasingAlphaDuration( long millisecs )
void setIncreasingAlphaRampDuration( long millisecs )
void setPhaseDelayDuration( long millisecs )
The recipe for using Interpolator and Alpha objects is very similar to using any behavior object. The major difference from the behavior usage recipe is to include the Alpha object.
public BranchGroup createSceneGraph() {
	// Create the root of the branch graph
	BranchGroup objRoot = new BranchGroup();

	// 1. create target TransformGroup with Capabilities
	TransformGroup objSpin = new TransformGroup();
	objSpin.setCapability(TransformGroup.ALLOW_TRANSFORM_WRITE);
	// 2. create Alpha that continuously rotates with a period of 1 minute
	Alpha alpha = new Alpha (-1, 60000);

	// 3. create interpolator object; by default: full rotation about y-axis
	RotationInterpolator rotInt = new RotationInterpolator(alpha, objSpin);
	// 4. add scheduling bounds
	rotInt.setSchedulingBounds(new BoundingSphere());

	// 5. assemble scene graph
	objRoot.addChild(objSpin);
	objSpin.addChild(new Clock());
	objRoot.addChild(rotInt);

	// Let Java 3D perform optimizations on this scene graph.
	objRoot.compile();

	return objRoot;
} // end of CreateSceneGraph method of ClockApp
PathInterpolator( Alpha alpha, float[] knots )
void setKnot( int index, float knot )
Path interpolator classes differ from the other interpolators in that they may store two or more values for interpolation.
The Java 3D core provides path interpolator classes for position interpolation, rotation interpolation, position and rotation interpolation, and position, rotation, and scale interpolation. The target of a path interpolator object is a TransformGroup object which changes the position, orientation, and scale, as appropriate, for its child objects.
Path interpolator objects store a set of values, or knots, that are used two at a time for interpolation. The alpha value determines which two knot values are used. The knot values are in the range of 0.0 to 1.0 inclusive, which corresponds to the range of values of the alpha object. The first knot must have a value of 0.0 and the last knot must have a value of 1.0. The remaining knots must be stored in increasing order in the path interpolator object. The knot values correspond with values for the variable parameter(s) (e.g., position or rotation) used in interpolation. There is one parameter value specified for each knot value. The knot with the largest value equal or less than the alpha value, and the next knot, are used. The knots are specified in order, so as the alpha value changes, the knots are used in adjacent pairs.
The RotPosPathApp.java example program uses an RotPosPathInterpolator
object to animate a ColorCube object through a number of position and rotation
values. The RotPosPathInterpolator stores sets of rotations (as an array of
Quat4f), positions (as an array of Point3f), and knot values (as an array of
float).
The complete source for RotPosPathApp.java is available in the examples/Animation subdirectory.
public BranchGroup createSceneGraph() {
	BranchGroup objRoot = new BranchGroup();

	//	1.
	TransformGroup target = new TransformGroup();
	//	2.
	Alpha alpha = new Alpha(-1, 10000);
	Transform3D axisOfRotPos = new Transform3D();
 	//	3.
	float[] knots = {0.0f, 0.3f, 0.6f ,1.0f};
 	Quat4f[] quats = new Quat4f[4];
	Point3f[] positions = new Point3f[4];

	target.setCapability(TransformGroup.ALLOW_TRANSFORM_WRITE);

 	AxisAngle4f axis = new AxisAngle4f(1.0f,0.0f,0.0f,0.0f);
	axisOfRotPos.set(axis);

	quats[0] = new Quat4f(0.0f, 1.0f, 1.0f, 0.0f);
 	quats[1] = new Quat4f(1.0f, 0.0f, 0.0f, 0.0f);
	quats[2] = new Quat4f(0.0f, 1.0f, 0.0f, 0.0f);

	positions[0]= new Point3f( 0.0f, 0.0f, -1.0f);
 	positions[1]= new Point3f( 1.0f, -1.0f, -2.0f);
	positions[2]= new Point3f( -1.0f, 1.0f, -3.0f);

	//	4.
	RotPosPathInterpolator rotPosPath = new RotPosPathInterpolator(
		alpha, target, axisOfRotPos, knots, quats, positions);

	//	5.
	rotPosPath.setSchedulingBounds(new BoundingSphere());

	objRoot.addChild(target);
   	//	6.
	objRoot.addChild(rotPosPath);
	target.addChild(new ColorCube(0.4));

	return objRoot;
} // end of createSceneGraph method of RotPosPathApp